 USD
USD EUR
EUR GBP
GBP CAD
CAD AUD
AUD
Beyoncé's Iconic Influence: Embracing The Stunning Lemonade Braids
Lemonade braids have emerged as a prevailing and stylish hairstyle, capturing the attention of fashion enthusiasts across all age groups. This popular trend draws its inspiration from Beyoncé's celebrated album "Lemonade," radiating a refreshing aura that perfectly complements its distinctive and intricate pattern. With their captivating appearance and versatility, lemonade braids have become a beloved choice for various occasions, from casual outings to formal events.
In this article, we delve into the world of lemonade braids, exploring their origins, the reasons behind their widespread popularity, and the characteristics that set them apart from traditional cornrows. Whether you possess a flair for hair braiding or are eager to experiment with a new style, this guide will take you through everything you need to know about creating and maintaining enthralling lemonade braids. Get ready to elevate your look with these stunning braids!
What are lemonade braids?
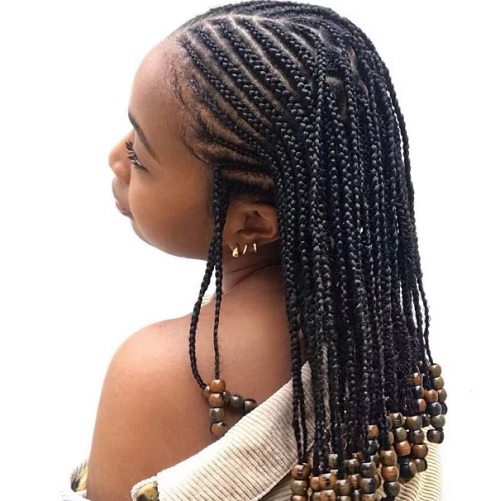
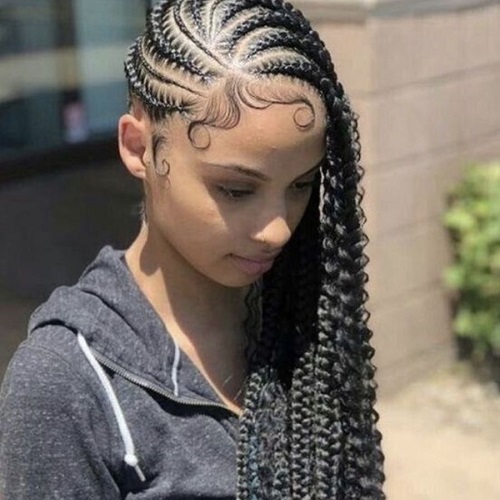
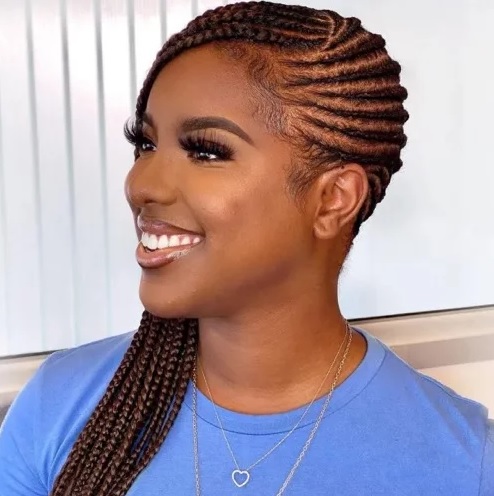
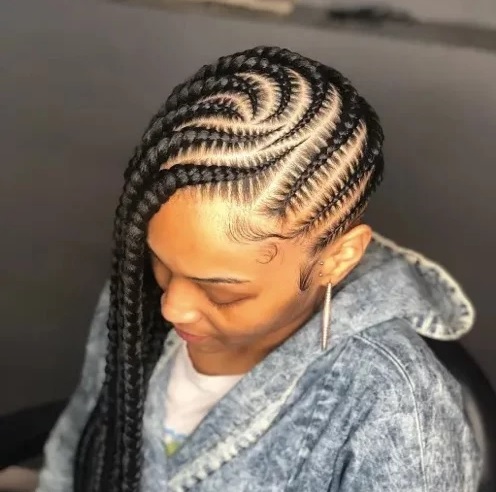
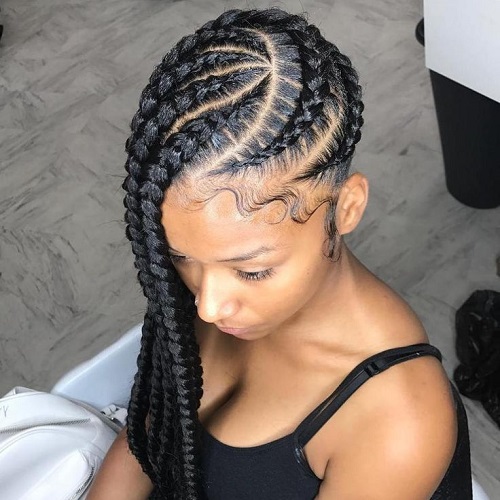
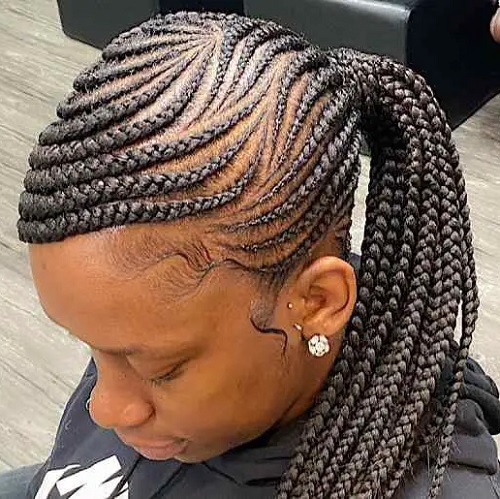
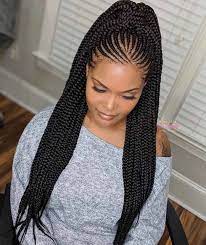
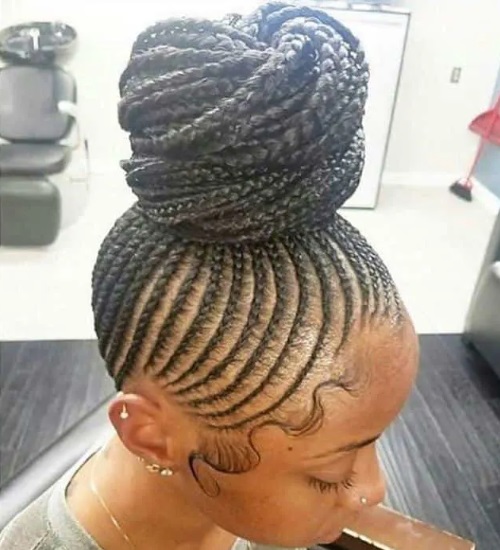
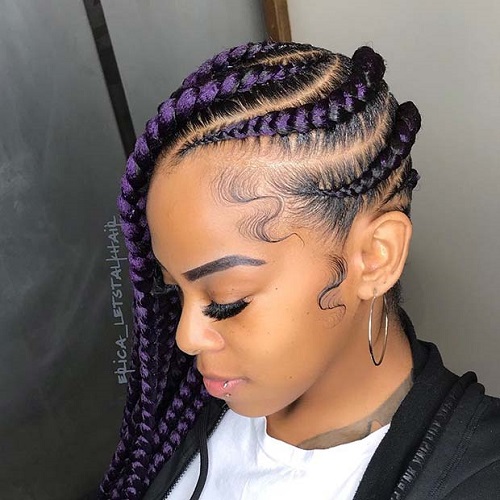
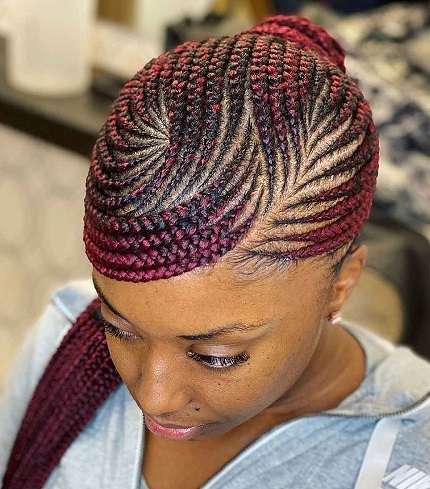
Lemonade braids are a popular and captivating hairstyle inspired by Beyoncé's album "Lemonade." They stand out with their intricate and dynamic design. Unlike traditional cornrows, lemonade braids follow a curvier pattern, starting with small, tight cornrows along the hairline and gradually transitioning into larger braids at the back. This creates a flowing effect reminiscent of lemonade cascading down a glass.
These braids offer both stylish and practicality. They can be styled in various ways, making them suitable for different occasions. From casual outings to formal events, lemonade braids add sophistication and charm to any look. Overall, they are a stylish and versatile expression of individual style, making them a timeless and fashionable choice for anyone seeking a distinct appearance.
Why are they called lemonade braids?
Lemonade braids are named after Beyoncé's album "Lemonade," released in 2016. In the album's visuals, Beyoncé wore this distinct braiding style, featuring small, intricate cornrows near the hairline that transition into larger braids at the back. The hairstyle's popularity surged as fans admired Beyoncé's iconic look, leading to it being widely known as "lemonade braids." The connection to Beyoncé and her powerful album has made this hairstyle a symbol of artistic expression and empowerment in the world of hair fashion.
What is the difference between Lemonade braids and cornrows?
Lemonade braids and traditional cornrows are both popular and timeless braiding styles, but they exhibit notable differences in their patterns, sizes, and overall appearances.
Pattern:
- Lemonade Braids: The defining characteristic of lemonade braids is their curvier and more dynamic pattern. They start with small, tight cornrows near the hairline, gradually transforming into larger and thicker braids as they extend toward the back of the head. This flowy and cascading pattern creates a visually striking effect.
- Traditional Cornrows: In contrast, traditional cornrows are braided flat against the scalp in straight rows. The cornrows are usually uniform in size and run parallel to each other, following a more linear and straightforward pattern.
Size:
- Lemonade Braids: Lemonade braids often showcase a combination of small and large braids. The small cornrows at the front are intricately braided, while the larger braids towards the back are more prominent and eye-catching.
- Traditional Cornrows: In traditional cornrows, the size of the braids is generally more consistent throughout, presenting a uniform and structured appearance.
Overall Look:
- Lemonade Braids: Lemonade braids offer a more intricate and artistic look. The flowing and varying sizes of the braids create a sense of movement and charm. The style is versatile, allowing for various styling options, such as ponytails, buns, or free-flowing braids over the shoulders.
- Traditional Cornrows: Traditional cornrows have a clean and neat appearance. They provide a classic and timeless look that is often preferred for its simplicity and ease of maintenance. However, the styling options are relatively limited compared to lemonade braids.
Complexity:
- Lemonade Braids: Due to their curvier pattern and combination of small and large braids, lemonade braids are generally more intricate and time-consuming to create than traditional cornrows.
- Traditional Cornrows: Traditional cornrows are relatively simpler and quicker to braid, making them a popular choice for those seeking a practical and efficient hairstyle.
In conclusion, while both lemonade braids and traditional cornrows are beautiful and versatile braiding styles, their patterns, sizes, and overall looks set them apart. Lemonade braids offer a more dynamic and flowing appearance, making them an excellent choice for those who seek a captivating and elegant hairstyle. On the other hand, traditional cornrows provide a clean and timeless look, perfect for those who prefer a classic and straightforward approach to braiding.
How to do Lemonade braids?
Creating lemonade braids without weave is a rewarding and achievable process with the right guidance. Follow this step-by-step guide to achieve stunning lemonade braids:
Note: Before starting, ensure your hair is clean, detangled, and moisturized. It's also helpful to have hair ties, clips, a rat-tail comb, and hair gel or edge control on hand.
Steps to do lemonade braids on natural hair
Step 1: Prepare Your Hair:
- Start by washing and conditioning your hair to ensure it's clean and manageable.
- Detangle your hair gently using a wide-tooth comb or your fingers to remove any knots or tangles.
- Apply a leave-in conditioner or hair moisturizer to keep your hair hydrated and easy to work with.
Step 2: Create Partitions:
- Use the rat-tail comb to create a middle part down the center of your head, dividing your hair into two equal sections – left and right.
Step 3: Start Braiding:
- Begin on one side (left or right) and take a small section of hair from the front near the hairline.
- Split this section into three equal parts and start braiding them, crossing the right strand over the middle, then the left strand over the middle.
- As you continue braiding, incorporate small sections of hair from the hairline into the braid.
- Keep braiding diagonally or curving the braid towards the back of your head to create the signature cascading effect of lemonade braids.
- Continue braiding until you reach the nape of your neck, and secure the end with a hair tie.
Step 4: Repeat on the Other Side:
- Repeat the braiding process on the other side, mirroring the pattern you created on the first side.
- Ensure both braids have a consistent size and follow the same diagonal or curved path toward the back.
Step 5: Braid the Back:
- Gather the remaining loose hair at the back of your head.
- Divide it into two equal sections and braid each section straight down.
- Secure the ends with hair ties.
Step 6: Edge Control or Gel:
- Apply a small amount of edge control or hair gel along your hairline to tame any flyaways and create a polished look.
Step 7: Finishing Touches:
- Carefully adjust and arrange the braids to ensure they have a smooth and even appearance.
- You can also gently pull on the edges of the braids to give them a slightly fuller look if desired.
Steps to create lemonade braids with weaves
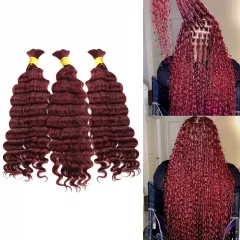
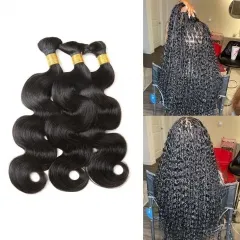
If you want longer braids, you can use hair extensions (weave) to add length to your natural hair before starting the braiding process.
Step 1: Part Your Hair:
- After preparing your natural hair, create a middle part down the center of your head, dividing your hair into two equal sections – left and right.
Step 2: Start Braiding:
- On one side, take a small section of your natural hair from the front near the hairline.
- Divide this section into three equal parts and start braiding them to form a small cornrow.
Step 3: Add Hair Extensions:
- Take a small piece of hair extension and incorporate it into the braid. Combine the extension hair with the natural hair as you continue braiding. This will make the braid thicker and longer.
Step 4: Continue Braiding:
- Keep adding hair extensions and braiding until you reach the nape of your neck.
- Secure the end of the braid with a hair tie.
Step 5: Repeat on the Other Side:
- Repeat the braiding process on the other side, mirroring the pattern created on the first side.
Step 6: Braid the Back:
- Gather the remaining loose hair at the back of your head.
- Divide it into two equal sections and braid each section straight down.
- Secure the ends with hair ties.
Step 7: Edge Control or Gel:
- Apply a small amount of edge control or hair gel along your hairline to tame any flyaways and create a polished look.
Benefits of Adding Weave:
- Length and Volume: Adding hair extensions allows you to achieve longer and thicker lemonade braids, creating a more dramatic and eye-catching effect.
- Versatility: Weave provides you with a wide range of options in terms of length, texture, and color. You can experiment with different looks, whether you want super long braids or add some highlights with colored extensions.
- Protective Styling: Lemonade braids with weave offer a protective styling option for your natural hair. The extensions act as a shield, reducing the risk of damage from everyday manipulation and environmental factors.
- Reduced Styling Time: With weave, you can achieve the desired length and thickness more quickly than relying solely on your natural hair's growth.
By incorporating hair extensions into your lemonade braids, you can elevate the style to new heights, creating a bold and dynamic look that complements your personality and enhances your overall appearance. Remember, practice makes perfect, so don't worry if your first attempt isn't flawless. With time and patience, you'll become more skilled at creating beautiful lemonade braids that showcase your unique style and flair.
Time and Hair Required
The time required to complete lemonade braids can vary depending on factors such as hair length, braid thickness, and the experience of the person doing the braiding. As a general estimate:
Time Required:
- For short to medium-length hair and medium braid thickness: Approximately 2 to 3 hours.
- For long hair and/or thicker braids: It may take 4 to 6 hours or more.
Keep in mind that creating lemonade braids can be a time-consuming process due to their intricate pattern and the need for precision.
Hair Packs Required: The number of hair packs needed for lemonade braids will depend on the braid thickness, length, and whether you choose to add extensions (weave) or not. On average:
- For thin lemonade braids (without extensions): 1 to 2 hair packs may be sufficient for shorter hair, while 2 to 3 packs could be needed for longer hair.
- For medium to thick lemonade braids (without extensions): 2 to 3 hair packs might be necessary for shorter hair, and 3 to 4 packs could be required for longer hair.
Adding Hair Extensions (Weave): If you decide to add hair extensions to achieve longer and thicker braids, you will need to purchase additional hair packs. The number of hair packs required for extensions will depend on the desired length and thickness you want to achieve. On average:
- For extensions: You may need 2 to 4 additional hair packs, depending on the length and thickness of the extensions.
It's essential to purchase high-quality hair packs that match your natural hair texture and color for the most seamless and natural-looking result.
Keep in mind that these estimates can vary based on individual factors and the specific technique used during the braiding process. If you are uncertain about the number of hair packs needed or how to achieve the desired thickness, consider consulting a professional hairstylist for personalized guidance and recommendations.
Longevity and Maintenance
Longevity: The longevity of lemonade braids depends on various factors, including the individual's hair texture, the quality of the braiding, and how well they are maintained. On average, lemonade braids can last anywhere from 2 to 6 weeks. However, with proper care and attention, you can extend their lifespan and keep them looking fresh for longer.
Maintenance Tips:
Tip 1: Keep Your Scalp Clean and Moisturized:
Gently cleanse your scalp with a sulfate-free shampoo to remove any buildup or dirt. Follow up with a lightweight conditioner to keep your scalp and hair moisturized. Avoid heavy oils or greasy products on your scalp, as they can cause product buildup.
Tip 2: Avoid Over-Manipulation:
Limit excessive touching, pulling, or styling of your lemonade braids, as this can lead to frizz and premature loosening of the braids. Be gentle when styling and tying your braids to reduce tension.
Tip 3: Tie Your Braids at Night:
Before going to bed, loosely tie your braids with a satin or silk scarf or use a satin/silk pillowcase. This helps to prevent frizz and reduces friction, preserving the style and keeping your hair hydrated.
Tip 4: Refresh Your Edges:
Lemonade braids typically have exposed edges, so take extra care of them. Apply edge control or gel to your hairline to maintain a neat appearance and prevent flyaways.
Tip 5: Protect Your Braids While Showering: Before showering, wear a shower cap or wrap your braids in a scarf to shield them from excess moisture. Avoid excessive exposure to water, as it can cause frizz and weaken the braids.
Tip 6: Avoid Heat Styling:
Minimize the use of heat-styling tools like flat irons or curling wands on your lemonade braids. Heat can cause damage to both your natural hair and the extensions, reducing the longevity of the style.
Tip 7: Regular Touch-Ups:
As your hair grows, you may notice new growth at the roots. Schedule regular touch-up sessions with a professional hairstylist to maintain the neat appearance of your lemonade braids.
Tip 8: Proper Removal: When you decide to remove the braids, do it carefully to avoid unnecessary breakage or damage to your natural hair. Use hair-friendly tools like hair shears to cut off the extensions instead of pulling or tugging them.
By following these maintenance tips, you can prolong the lifespan of your lemonade braids and enjoy their stunning appearance for an extended period. Remember, proper care and attention to your hair will not only preserve the style but also promote healthy hair growth.
10 Trendy lemonade braids styles for all ages
Classic Lemonade Braids:
The signature style with small, intricate cornrows near the hairline, flowing into larger braids at the back. Versatile and elegant, perfect for any occasion.
- Follow the steps mentioned in the "How to Create Lemonade Braids" section earlier to achieve the classic lemonade braids style.
Lemonade Ponytail:
Gather your lemonade braids into a high or low ponytail for a chic and easy-to-manage look that keeps your hair off your face.
- Gather all your lemonade braids into a high or low ponytail using a hair tie.
- Use edge control or gel to smooth any flyaways or baby hairs around your hairline.
Half-Up Lemonade Braids:
Part your hair in the middle and gather the braids from the front into a half-up, half-down hairstyle, leaving the rest of the braids cascading down your back.
- Part your hair in the middle to divide it into two equal sections.
- Take the braids from the front on one side and gather them into a half-up ponytail, securing them with a hair tie.
- Repeat the same on the other side.
- Use edge control or gel to keep the hair around your hairline neat.
Lemonade Bun:
Create a sleek bun with your lemonade braids for a sophisticated and polished appearance.
- Gather all your lemonade braids into a high or low ponytail.
- Wrap the ponytail around the hair tie to form a bun.
- Use hairpins to secure the bun in place.
- Apply edge control or gel to smooth any stray hairs.
Jumbo Lemonade Braids:
Opt for thicker and more voluminous lemonade braids to make a bold and fashionable statement.
- Use larger sections of hair when creating your lemonade braids to achieve a jumbo-sized look.
- Follow the braiding process as described in the "How to Create Lemonade Braids" section, but with thicker sections.
Colored Lemonade Braids:
Add some color to your braids by incorporating hair extensions in different hues, making your lemonade braids even more eye-catching.
- Purchase hair extensions in the desired colors and attach them to your natural hair while braiding.
- Incorporate the colored extensions into your lemonade braids as you follow the braiding process.
Zigzag Lemonade Braids:
Create a unique and trendy look by braiding your lemonade braids in a zigzag pattern rather than a straight line.
- Instead of creating straight rows, create a zigzag parting pattern using a rat-tail comb before starting the braiding process.
- Follow the zigzag pattern while braiding your lemonade braids.
Lemonade Braids with Beads:
Add some flair to your lemonade braids by accessorizing them with colorful beads or cuffs, giving them a fun and playful touch.
- Slide colorful beads onto the ends of your lemonade braids.
- Alternatively, use hair cuffs or rings to adorn your braids.
Lemonade Braids with Twists:
Intertwine some twists or rope braids along with your lemonade braids for an intricate and textured style.
- Intertwine small twists or rope braids with your lemonade braids as you braid your hair.
- Incorporate the twists along the path of the lemonade braids.
Side-Swept Lemonade Braids:
Sweep all your braids to one side for a glamorous and red-carpet-worthy look that exudes chic.
- Start braiding your lemonade braids as usual.
- Once the braids are complete, sweep them all to one side of your head and secure them with a hair tie or pins.
- Use edge control or gel to keep the hair around your hairline smooth and polished.
Remember to take your time and be patient while achieving these lemonade braid hairstyles. They may require some practice, but the result will undoubtedly be stunning and worth the effort!
Conclusion:
Lemonade braids are a popular and versatile hairstyle loved by people of all ages. Their unique pattern exudes charm and sophistication, making them perfect for various occasions.
Try lemonade braids to express your individuality and creativity through hair fashion. You can explore different variations, from classic to jumbo styles, and even add colored braids for a fun touch.
For a seamless and confident look, consider using 100% human hair extensions and wigs from Ula Hair. We offer premium-quality products that blend seamlessly with your natural hair.
Embrace the artistry and versatility of lemonade braids to elevate your look and boost your confidence. Step into this stylish and enduring hairstyle that celebrates beauty and empowerment. Enjoy the compliments and admiration that come with this mesmerizing hairstyle!
Related Posts:
Step-by-Step Tutorial: Achieving Beautiful Medium Knotless Braids Safely
Unlocking the Beauty of Tribal Braids: A Comprehensive Guide
All You Need To Know About Peekaboo Braids
A Comprehensive Guide To Pop Smoke Braids