 USD
USD EUR
EUR GBP
GBP CAD
CAD AUD
AUD
I-Tip Hair Extensions: Everything You Need to Know
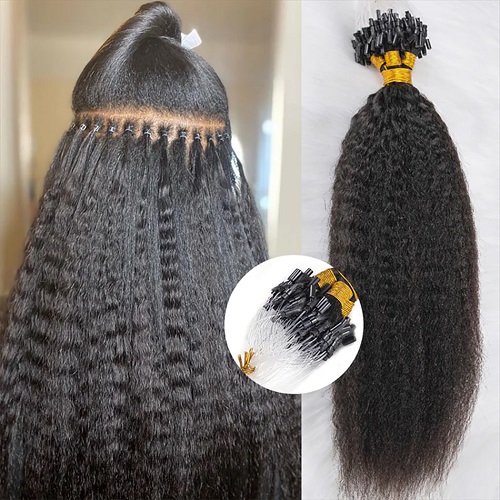
If you've ever thought about giving your hair a little extra oomph or trying a new look, you might have heard of I-tip hair extensions. They're like magic strands that blend seamlessly with your own hair, adding length and volume. What makes them unique is their "I" shape – each strand of hair is attached to a tiny, bead-like structure that resembles the letter "I." This design ensures they stay put and look natural.
In this article, we're going to break down I-tip hair extensions for you. We'll explain what they are, how they're different from other extensions, and why people love them. You'll also learn how they're put in and what it takes to maintain them.
But that's not all! We'll discuss what you should consider before getting I-tip extensions, like matching them to your hair type and color. And don't worry, we'll clear up any myths or doubts you might have about these extensions.
By the time you finish reading, you'll be in the know about I-tip hair extensions and whether they're right for you.
What are I-tip hair extensions?
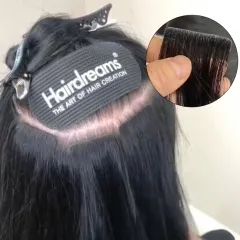
I-tip hair extensions are a type of hair extension that's designed to add length and volume to natural hair. The name "I-tip" comes from the shape of the extension's tip, which resembles the letter "I." Each strand of hair is attached to a small, bead-like structure that has this "I" shape.
The unique design of I-tip extensions allows for a secure and discreet installation. During the installation process, the hair extension strands are clamped using special beads or rings, holding them in place securely. This method gives a natural appearance, allowing wearers to style their hair just like they would with their own.
These extensions are popular because they blend seamlessly with natural hair, offering a natural and fuller look. The "I-tip" attachment provides flexibility in movement and comfort while ensuring the extensions stay in place. Additionally, they can be easily removed and reinstalled, making them a versatile choice for those seeking a temporary or long-term hair transformation.
Overall, I-tip hair extensions are a popular choice for individuals looking to enhance their hair without compromising on a natural and effortless appearance.
How do I-tip hair extensions differ from other types of hair extensions?
I-tip hair extensions have distinct differences from other common types of hair extensions like clip-ins, tape-ins, and hair wefts. Let's explore these differences:
Attachment Method:
- I-Tip Extensions: I-tip extensions are attached using a small, bead-like structure that has an "I" shape. The natural hair is threaded through the bead, and then the bead is clamped to secure the extension in place.
- Clip-In Extensions: Clip-ins are temporary extensions with clips attached to the weft. They can be easily clipped onto the natural hair and removed at the end of the day.
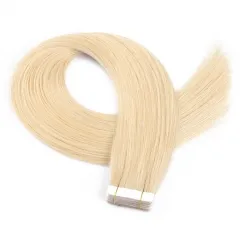
- Tape-In Extensions: Tape-ins are pre-taped wefts that are sandwiched around sections of the natural hair. The extensions adhere to the hair using a medical-grade adhesive.
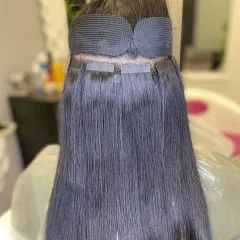
- Hair Weft Extensions: Weft extensions involve a track or a bundle of hair that is sewn into braided natural hair or attached using a bead or glue.
Application Time:
- I-Tip Extensions: Installation of I-tip extensions typically takes longer due to the careful threading and clamping process for each strand.
- Clip-In Extensions: Clip-ins are quick to install and can be done at home without professional help.
- Tape-In Extensions: Tape-ins are relatively faster to apply compared to I-tips as the wefts can be adhered in larger sections.
- Hair Weft Extensions: The application time for weft extensions varies, but it generally falls between the time taken for I-tip and tape-in extensions.
Reusability:
- I-Tip Extensions: I-tip extensions can be reused after removal, provided they are in good condition and have been well-maintained.
- Clip-In Extensions: Clip-ins are reusable and can be worn multiple times.
- Tape-In Extensions: Tape-ins can be reapplied for several uses, making them semi-permanent but not as reusable as clip-ins.
- Hair Weft Extensions: Weft extensions are reusable, but the frequency of reuse may vary depending on the attachment method and maintenance.
Comfort and Flexibility:
- I-Tip Extensions: I-tip extensions offer a natural and comfortable feel due to their lightweight and the individual strand attachment method.
- Clip-In Extensions: Clip-ins provide flexibility as they can be removed and worn as desired, making them ideal for occasional use.
- Tape-In Extensions: Once applied, tape-ins are flexible and comfortable, allowing for natural movement of the hair.
- Hair Weft Extensions: Weft extensions can be comfortable, but the level of comfort may vary based on the attachment technique and the weight of the weft.
Understanding these differences helps individuals choose the type of hair extension that aligns with their preferences, lifestyle, and desired look. Each type offers its unique benefits and considerations for those seeking hair enhancement.
Advantages of I-Tip Hair Extensions
- Natural and Discreet Appearance: I-tip hair extensions provide a remarkably natural and seamless look when blended with your natural hair. The individual "I" shaped attachments create a discreet transition between the extension and your own hair, making it difficult for anyone to detect that you're wearing extensions. This natural appearance allows you to confidently wear your hair in various styles without worry.
- Long-lasting and Durable: I-tip extensions are known for their durability and longevity. When properly installed and cared for, they can last for a considerable amount of time, making them a cost-effective investment. The "I" shaped attachment ensures that the extensions stay securely in place, enduring daily activities and various styling routines.
- Versatility in Styling: One of the major advantages of I-tip extensions is the versatility they offer in styling. You can style your hair just like you would your natural hair—curl, straighten, or even tie it up in a ponytail or bun. The individual strand attachment allows for natural movement and adaptability, enabling you to achieve the look you desire for any occasion.
- Minimal Damage to Natural Hair: Compared to some other extension methods, I-tip extensions are gentle on your natural hair. The installation process involves clamping the extensions to your hair using the "I" shaped beads without any heat or chemicals. This results in minimal damage, ensuring the health and integrity of your own hair throughout the wearing period. Additionally, the weight of the extensions is distributed evenly across the strands, reducing stress and potential damage.
In summary, I-tip hair extensions provide a natural, durable, and versatile solution for those seeking to enhance their hair. Not only do they seamlessly blend with your natural hair, but they also allow for a range of styling options while minimizing any adverse effects on your existing hair.
How I-Tip Hair Extensions are Installed
A. Preparation of Natural Hair:
- Consultation: Begin with a consultation with a professional stylist who specializes in hair extensions. Discuss your desired look, color, length, and overall goals.
- Hair Assessment: The stylist will assess your natural hair, ensuring it's in a suitable condition for extensions. They will determine if your hair can support the weight and stress of the I-tip extensions.
- Color Matching: Match the color and texture of the extensions to your natural hair for a seamless blend.
- Wash and Dry: Before installation, your natural hair will be washed and dried thoroughly to ensure a clean base for the extensions.
B. Installation Process Step-by-Step:
- Sectioning: The stylist will section your hair, starting at the nape of your neck, and work their way up to the crown. The hair is sectioned horizontally to create a base for the extensions.
- Threading: A small section of your natural hair is threaded through a metal ring or bead that has the "I" shape, forming a base for the extension.
- Attachment: The I-tip extension strand is then inserted through the ring, and the stylist uses special pliers to clamp the ring, securing the extension and natural hair together.
- Repeat Process: The stylist repeats this process, working their way up the head until all desired areas are covered.
- Blending and Styling: Once the extensions are in place, the stylist will blend the extensions with your natural hair, ensuring a seamless and natural appearance. They will then style your hair according to your preference.
C. Duration and Maintenance:
- Installation Time: The duration of the installation can vary based on the desired volume and length. On average, it takes around 2 to 4 hours to install a full set of I-tip extensions.
- Repositioning and Tightening: Over time, as your natural hair grows, the extensions may move away from the scalp. It's essential to have them repositioned and tightened by a professional stylist to maintain a natural look and prevent discomfort.
- Regular Maintenance: Routine maintenance appointments, usually every 6-8 weeks, are crucial to ensure the extensions remain secure, comfortable, and blend well with your natural hair. During these appointments, the stylist may adjust, reposition, or replace any extensions as needed.
By following these steps and attending regular maintenance appointments, you can enjoy a beautiful and natural look with I-tip hair extensions.
Factors to Consider Before Getting I-Tip Hair Extensions
A. Hair Type and Suitability:
- Hair Health: Assess the current health of your natural hair. I-tip extensions may not be suitable for very fragile or severely damaged hair, as the attachment method could cause further stress.
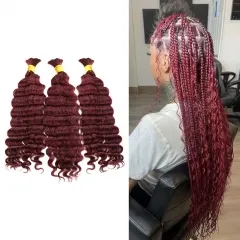
- Hair Texture: Consider your hair's texture—whether it's straight, wavy, or curly. Ensure that the I-tip extensions you choose match or complement your hair's texture for a seamless blend.
- Hair Length: I-tip extensions work best with hair that is at least shoulder-length to allow for a secure attachment and a natural look.
- Hair Thickness: Evaluate your hair's thickness. I-tip extensions can work for various hair thicknesses, but the amount of extensions needed may vary based on your natural hair density.
B. Color Matching and Texture Considerations:
- Color Matching: Ensure a precise color match between the I-tip extensions and your natural hair. It's best to consult a professional stylist who can help you choose the closest match or even customize the extensions to blend seamlessly.
- Texture Matching: Match the texture of the I-tip extensions to your natural hair—whether it's straight, wavy, curly, or another texture. A good match will make the extensions look more natural and integrated.
- Ombre or Highlights: If you have ombre or highlighted hair, consider I-tip extensions that match the different shades or highlights to create a cohesive and blended appearance.
C. Professional Consultation and Recommendations:
- Consult a Specialist: Schedule a consultation with a professional stylist who specializes in extensions, especially I-tip extensions. They can assess your hair, discuss your expectations, and recommend the most suitable extensions based on your needs.
- Installation Expertise: Choose a skilled and experienced stylist for the installation process. Proper installation is crucial to ensure the extensions are securely attached and blend seamlessly with your natural hair.
- Maintenance Advice: Seek advice on how to properly care for and maintain the I-tip extensions. A professional stylist can provide recommendations for washing, styling, and overall maintenance to prolong the lifespan of the extensions.
- Aftercare Products: Ask for recommendations on suitable shampoos, conditioners, and styling products that will keep your I-tip extensions in optimal condition and maintain their appearance.
By carefully considering your hair type, color matching, and seeking professional consultation, you can make informed decisions before getting I-tip hair extensions, ensuring a successful and satisfying experience.
Maintenance and Care for I-Tip Hair Extensions
A. Washing and Conditioning:
Tip 1: Use Sulfate-Free Shampoo: Choose a sulfate-free, gentle shampoo to cleanse your I-tip extensions. Sulfates can strip the extensions of natural oils and moisture.
Tip 2: Gently Wash Extensions: Hold the extensions at the roots while washing to prevent unnecessary tugging or pulling. Use a gentle, downward motion to wash without causing damage.
Tip 3: Condition the Ends: Focus conditioner on the mid-lengths and ends of the extensions, where they need the most moisture. Avoid applying conditioner near the attachment points to prevent slippage.
Tip 4: Detangle Carefully: Use a wide-tooth comb to detangle the extensions, starting from the ends and gradually working your way up. Hold the extension at the roots to avoid pulling on the attachment points.
Tip 5: Air Dry or Low Heat: Allow the extensions to air dry whenever possible. If using heat, use a low-heat setting to prevent damage. Always use a heat-protectant spray before styling.
Tip 6: Avoid Overwashing: Limit washing to 2-3 times per week to maintain the integrity of the extensions and prevent dryness.
B. Styling Tips and Techniques:
Tip 1: Use Heat Styling Sparingly: Minimize the use of heat-styling tools (e.g., straighteners, curling irons) to prevent heat damage. Opt for heatless styling methods whenever possible.
Tip 2: Style Extensions While Dry: Style the extensions when they are completely dry to prevent weakening due to excess moisture.
Tip 3: Loose Braids for Bedtime: Braid the extensions into loose braids before bed to prevent tangling and maintain their condition overnight.
Tip 4: Protect During Exercise: Tie the extensions in a ponytail or bun during physical activities to prevent unnecessary pulling or friction.
Tip 5: Avoid Hair Products Near Bonds: Keep hair products like oils, serums, or sprays away from the attachment points to prevent them from slipping or loosening.
C. Regular Maintenance Appointments:
Tip 1: Scheduled Check-ups: Attend regular maintenance appointments, typically every 6-8 weeks, with your stylist for a thorough check-up of the extensions. They will ensure the extensions are secure and make any necessary adjustments.
Tip 2: Repositioning if Needed: Allow the stylist to reposition any extensions that may have shifted or grown out to maintain a natural and seamless look.
Tip 3: Trimming and Blending: If necessary, the stylist can trim and blend the extensions to ensure they integrate well with your natural hair.
By following a proper maintenance routine, you can extend the lifespan of your I-tip hair extensions, keep them in excellent condition, and enjoy a flawless and natural appearance. Regular professional check-ups are key to ensuring the extensions stay secure and maintain their integrity over time.
Frequently Asked Questions (FAQs) about I-Tip Hair Extensions
Q1: How long do I-tip hair extensions last?
A: I-tip hair extensions can last anywhere from 3 to 6 months, depending on the quality of the extensions, how well they are maintained, and your hair's natural growth rate.
Q2: Can I wash my hair as usual with I-tip extensions?
A: Yes, you can wash your hair with I-tip extensions, but it's important to use sulfate-free shampoo and conditioner to maintain the extensions' integrity and prevent dryness. Avoid applying hair conditioner to the roots to avoid I-tips slipping out.
Q3. Are I-tip extensions suitable for all hair types?
A: I-tip extensions can work for various hair types, but it's essential to consider your hair's health, thickness, and texture to ensure a secure and natural-looking installation.
Q4: Can I style I-tip extensions with heat tools?
A: If your i-tip hair extensions are made of 100% human hair, you can style them with heat tools; however, it's advisable to use low heat settings and avoid applying heat to the roots to prevent damage.
Q5: Can I swim or exercise with I-tip extensions?
A: Yes, you can engage in these activities with I-tip extensions. It's recommended to tie the extensions in a ponytail or bun during exercise and wash and condition them after swimming to maintain their condition. It's also recommended that to put on a swimming cap to prevent your hair extensions from getting tangled.
Q6. Can I dye or color I-tip extensions?
A: It's generally not recommended to dye I-tip extensions yourself, as the process can weaken the hair and affect the attachment. And the junctions may become obvious after you do so.
Q7. How are I-tip extensions removed?
A: I-tip extensions are removed by a professional stylist using a specific solution that loosens the bonds. The extensions are then gently slid out of the natural hair without causing any damage.
Q8. Can I reuse I-tip extensions after removal?
A: Yes, I-tip extensions can be reused if they are in good condition after removal. The stylist may need to replace the beads and reposition the extensions for reuse.
Q9. Can I sleep with wet hair if I have I-tip extensions?
A: It's recommended to allow your hair and extensions to dry completely before sleeping to prevent tangling and potential damage.
 40%
40%
OFF Sale-
$87.97
$146.91(1098) (1043)

 40%
40%
OFF Sale-
$65.72
$109.75(1470) (906)

 40%
40%
OFF Sale-
$70.42
$117.60(1089) (1062)

 40%
40%
OFF Sale-
$85.63
$143.00(1324) (1058)

 40%
40%
OFF Sale-
$59.31
$99.04(1311) (1081)

 40%
40%
OFF Sale-
$78.61
$131.28(1300) (1058)

 70%
70%
OFF Sale-
$75.10
$254.37(2062) (1257)

 68%
68%
OFF Sale-
$72.76
$230.93(2046) (1257)

Conclusion
We've covered I-tip hair extensions, which are a great way to enhance your hair naturally. They blend well, last long, allow various styles, and are gentle on your natural hair. If you're looking to change up your hairstyle, I-tip extensions are a fantastic option. They're easy to manage, last a good while, and let you style your hair as you like. For a wide selection of quality human hair extensions, check out Ula Hair.
For the best experience, always have a professional stylist install your I-tip extensions. Regular check-ups with them are key to maintaining a great look and feel. Taking good care of your extensions keeps them in top shape, so they'll keep you looking fabulous.
Choose I-tip hair extensions for an exciting hair transformation, and enjoy the versatility and convenience they bring to your daily style!
Feel free to let me know if you need further adjustments!
Related Articles:
Microlinks vs. Tape-Ins: Which Hair Extension Method is Right for You?
A Guide to Seamless Clip-In Hair Extensions
Which Hair Extension Methods Last Longer?
5 Easy Hairstyles To Hide Hair Extensions