 USD
USD EUR
EUR GBP
GBP CAD
CAD AUD
AUD
How Long Does a Quick Weave Last?
How Long Does a Quick Weave Last?
A quick weave is a hair-weaving technique where a wig cap is fitted to the head. Hair weaves are attached to the cap using bonding glue or adhesive tape. It is a fast and affordable way to add length, volume, and color to natural hair without the need for braiding and sewing. The quick weave is popular among people who want to quickly change their hairstyle, or for those who want a cheaper alternative to sew-in hair extensions.
Quick weaves cannot last as long as sew-in weaves. A quick weave can typically last for one month, while a sew-in weave can typically last for around two months. Here in this post, we are happy to share with you how to make a quick weave last longer, including instructions for installation, removal, and maintenance.
How long can a quick weave last?
A quick weave typically lasts 4-5 weeks with proper installation and maintenance. However, the lifespan of a quick weave can vary depending on the type of hair used, the way it is installed, and the individual's hair care routine.
How to make your quick weave last longer?
What hair weave is appropriate for a quick weave style?
To answer the question in a nutshell, 100% Remy hair or virgin hair is without a doubt the most desirable. Three types of hair extensions can be used for the quick weave technique: human hair, synthetic hair, and mixed hair. To ensure a longer-lasting and more natural result, make sure the hair weave you buy is 100% cuticle-aligned human hair (Remy hair or virgin hair). This type of hair is more textured, durable, and less likely to get tangled.
Instructions to properly install a quick weave
Step 1: Cleanse your scalp and hair
Brush your hair first with a wide-tooth comb to minimize tangles and build-ups. If necessary, trim split ends and damaged hair in advance. Then, shampoo and condition your hair with sulfate-free hair care products. A clean and healthy base can make a quick weave last longer.
Prepare the extensions by brushing them out to remove any tangles. You can also wash and condition the extensions, following the instructions on the package. Clean and high-quality human hair extensions are essential for long-lasting results.
Step 2: Braid your hair
Start by braiding your hair down flat and tight in cornrows. If you have long braids, stick the tails of the braids into the gap between the cornrows to create a flat base. If your natural hair is very short, you can slide your hair back with Got2B glue without spending time braiding your hair. Just make sure to create a clean, smooth base for the weave to lay on. After that, apply the Got2B spray to your hair to add an extra barrier. This can help prevent your hair from getting clumped by glue.
Braid your hair tight but not too tight, or it could cause extra tension on your scalp. And you may need to remove the quick weave before your schedule.
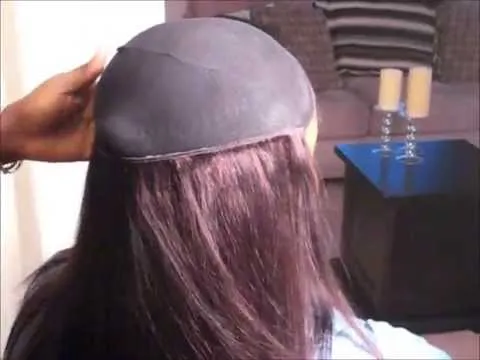
Step 3: Put on a wig cap
Put on a weaving cap and ensure all your hair is well covered under the cap. You can also put on two weaving caps to give your hair extra protection. Then, spray your weaving cap with some Got2B. This can not only keep the braids in place and flat to ensure a natural appearance but also protect your hair underneath from clumping and shedding.
Step 4: Glue in weaves
Cut the hair weft to the appropriate length for your head. You will need to measure the length from the nape of your neck to the crown of your head. Spread glue on the hair weft, and let the glue dry completely before installing the weave.
And then glue it to the weaving cap at the nape of your neck. Press the hair weft for a few seconds to ensure the hair weft can be firmly glued to the cap.
Step 5: Repeat the process
Repeat the gluing process from the nape of your neck and work your way up until all the hair is glued to the cap. Make sure to glue the wefts in straight lines and keep them flat.
Step 6: Trim and style
Once you have glued all the hair in, trim the weave to your desired length and style as desired to create a natural look.
Be aware to treat it with the appropriate products. Avoid applying conditioner, oil, and heat to the bonding area.
Tips to maintain a quick weave
Here are some tips to maintain glue-in weaves and keep them looking fresh:
- Choose the right glue: Use a high-quality, waterproof weave glue that is specifically designed for hair extensions.
- Apply the glue evenly: Use a small brush or your finger to apply the glue evenly and carefully along the weft of the hair. Avoid getting glue on your skin or scalp.
- Allow the glue to dry: Let the glue dry completely before installing the weave. This may take several minutes, depending on the type of glue.
- Avoid sweating: Avoid sweating, as this can cause the glue to loosen or break down. If you do sweat, be sure to clean the hair and reapply the glue if necessary.
- Avoid using hot tools: Avoid using hot tools, such as curling irons, straighteners, and blow dryers, as they can cause the glue to melt or break down.
- Remove the weave carefully: When it's time to remove the weave, be sure to do so gently and carefully to avoid damaging the glue or pulling out the hair.
Instructions for removing a quick weave properly
Here are quick step-by-step instructions to properly remove your quick weave without damaging your natural hair.
- Start by washing the hair with a clarifying shampoo to remove any build-ups from previous products or treatments.
- Using a wide-tooth comb, gently detangle the hair to loosen the glue.
- Apply a glue remover solution specifically designed for removing hair extensions. Be sure to follow the instructions on the product carefully. Or you can remove the quick weave using some natural oils, such as olive oil, baby oil, conditioner, coconut oil, etc.
- Using your fingers, massage the oil or solution into the hair and let it sit for a few minutes.
- Gently comb through the hair with a wide-tooth comb to help break down the glue. Repeat this process until all of the glue is removed.
- Rinse the hair thoroughly with warm water to remove all traces of the oil or solution.
- Follow up with a deep conditioning treatment to help restore the hair’s natural moisture and shine.
Note: It is imperative to be gentle when removing glue from the hair as it may cause damage if done too harshly.
Ula Hair offers a wide selection of 100% human hair for quick weaves. Click and explore high-quality human hair extensions for black hair in a variety of textures, lengths, and colors. If you still have any doubts about the quick weave technique, feel free to reach out to our sales consultants online. We are always there and pleased to help.
Related Posts:
How To Half Up Half Down Quick Weave?